Showing posts with label Nosh Lab. Show all posts

Sunday, 2 December 2012

Nosh Lab : Cari de poulet (comme à la Réunion)

Cari Poulet - a dish from Reunion Island
Bastardised by me on account I served it with bread!
Traditionally it is served with rice.

Obviously I'm still cooking , although I haven't blogged about my foodie venturings in a while. So much to eat and so little time to write about it! Anyway, the picture above is of Cari Poulet which is a bit of a culinary adventure for me in creole cooking courtesy of my •❤• Angel.

Ingredients: 
Chicken (I used 3 leg portions)
Tomatoes (I used what I had but I'd estimate about 6 medium salad tomatoes to make about a cup in measurement)
Onion (1 large brown onion, thinly sliced)
Garlic (aprox. 2-3 cloves which might be too garlicky for some - do to taste)
Thyme
Tumeric
Fresh Ginger (aprox. 1 inch)
3 Cloves Garlic
Fresh black pepper
Sea Salt

Honestly, this organised ingredients pic is only for the blog.
I'm never this neat actually cooking. Maybe that's why I never blog!
Clockwise left to right : Garlic + Ginger, Tumeric, Thyme ( I used dried but I think fresh would have made a more authentic dish - Angel says use 2 sprigs) , Salt + Pepper, 1 Clove.

So the funny thing about this dish is I've never tasted the actual thing and a lot of the nuances of actually cooking it, is an educated guess on my part. This is my interpretation based on the recipe that was shared with me. I made it because I had most of the ingredients to hand and said I would!
It's surprisingly good for its simplicity.

Method :

In a pestle, pound ginger, garlic, salt and pepper
Pound to a paste  
Basically so there aren't any huge lumpy bits of spice
Slice onion thinly - Angel's top tip (and I quote) 
" ... so that the onion melts"
I was told in the authentic dish they are fond of using small tomatoes.
I had an assortment so I basically cut them up about the same size ie. halves and quarters.
Now here is where a good non stick pan is essential.  
Brown off the chicken in a hot non stick skillet
This is done by dry frying (not adding anything else)  on a high heat - Here you can see I used a splatter guard because the chicken skin will eventually produce quite a bit of oil on its own. 
(aprox. 5-10 mins)
Then to ensure that the chicken is moist, cover  to cook via steaming 
(aprox. 5 mins -10 mins) 
When skin is a golden brown and meat is part cook,  
add onions and continue to cook gently
As the onions begin to become softer and more translucent,
add the pounded paste of salt + pepper + garlic + ginger
Follow on with the rest of the dry spices ie. Tumeric + Thyme + Clove
Gently cooking and mixing till everything in the skillet is a lovely golden tumeric colour
Continue to saute gently as you add your tomatoes...
(Which just means to stir and turn your chicken + onions + spices + tomatoes 
while the dish is on a medium - low  heat) 
To break down and finish cooking the ingredients through,
turn heat down to low, cover pan and simmer. 
(aprox. 15 minutes)
Here you can see that the chicken is cooked through 
(comes away from the bone around the cartilage)
The tomatoes have broken down to form a liquor with the rest of the pan juices.
The actual dish I'm told is relatively dry - so all I did was reduce the liquid in half by cooking uncovered. 
Finally, I added a chilli (sliced into so that the heat is infused in the last stage of cooking)
and garnished the dish with sliced spring onions
20 seconds later  - this was all that was left
(Ok ... I exagerate but it was GOOD and it went FAST)
Angel thinks I'm heathen because I served it with bread. I know.. it's sacrilege !

Friday, 30 November 2007

The nooks of deboning a drumstick

This is the way we debone our drumstick...


so you can stuff it with stuff :


like so :


and then you get this :)

Tuesday, 24 July 2007

Aunty RW's Carrot Cake

My Aunty RW. made what I think of as the closest to ultimate carrot cake.
Beautifully moist in texture and ever so easy to put together although admittedly when I made it, I did not follow the original recipe. However it did result in an even simpler to put together carrot cake although I'm still playing around with the process to make the cake more moist. I find that it can get quite stoggy (thick) and dense in texture.

Apparently my mom used to make carrot cake just to make sure my brother and I ate our vegetables!

[ d e f i n i t i o n ]
Ultimate Carrot Cake
Moist crumbly texture without being cloyingly sweet. Must have slight fibrous crunch of finely shreded carrots, and be some how light although choc-a- bloc full of ingredients. False sense of being somewhat healthy and good for you! Must also be iced with Ultimate Cream Cheese Frosting.

Aunty RW's Recipe
Carrot Cake

500g carrots, grated
300 flour
250 brown sugar
2tsp baking soda
1tsp baking powder
_ tsp salt
3 tsp ground cinnamon
4 eggs
_ c vegetable oil
2ts vanilla essence
150g pineapples, chopped
80g raisins
80g walnuts or pecans, toasted and chopped

Preheat oven to 175C, prepare 12” x 8” pan.
In large bowl, sift flour, baking soda, baking powder, salt, cinnamon powder and combine with brown sugar, mix well. Add carrots and raisins. Mix well.
Add vanilla to eggs, beat slightly.
Add eggs, oil, pineapple, nuts to flour mixture and stir until all moisten.
Pour into prepared pan, bake 30-40 mins or until toothpick inserted into cake centre comes out clean.
Allow to cool for 15 mins, turn onto rack to cool.


Wednesday, 7 February 2007

Nosh Lab : Home Wines and Passion Fruit Wine Recipe


I started to make 'Country Wine' in 2005 having tasted the labours of one of my friends who'd been making her own wine for quite a number of years! It was unlike anything I had ever tasted before and that spurred me on to find out how to go about making some of my own.

I bought a book and my first wine kit. (As back-up incase my own experiment turned into vinegar - me and my fear of failure!?) So the very first Nosh'lette vintage is a Cabernet Sauvignion 2005 (as depicted in above picture). After I'd got the gist of how to make wine (it really isn't all that difficult), I made my first 'from scratch' out of strawberries which produced a most unusual, subtle and pleasing wine. The nice thing about making your own wine is that it also makes a unique gift - and when you start giving away your own bottles of wine; people start giving you things to encourage your wine making habit. Pretty soon I found myself acquiring 7 demi johns, each producing 6 bottles of wine. Strangely though, the demand from friends and family outweighed the amount of wines we were producing. Trust Liam to bring in the industrial revolution and whilst I was out visiting with friends in London, he brought in the 5 gallon fermentation buckets! (Talk about kitchen gadgetry!)

Pic : Wine all over my kitchen counter tops.
You can just see the 5 gallon bucket on the floor looking deceptively small!

On one of my trips back to Singapore, I decided to take across a home brew kit just to see if making wine from tropical fruits was a viable idea. The wine making yeast thrives best in warm climes but dies in anything above 30 degrees C. Also it doesn't like sudden fluctuations in temperature. It's funny thinking back on it as the fermenting wine ended up living in a bucket of water in the coolest part of the house - The Kitchen bathroom!

This pic is of my wine making experiment in SG.
1) I used a plastic demi john but really any 2 litre water bottle with a screw top will do as long as you can keep it sterile. 2) A picture of your little wine making buddies - the yeast 3) The demi john is fitted with a fermentation lock - basically it's a bendy tube filled with water so carbon dioxide formed by the yeast can escape through the water but nothing from the atmosphere enters the bottle. Clever huh? 4) Fermentation is relatively fast in SG. and a clear wine was achieved in the space of a week and a half or so.

Of all the wines that I have made, the most interesting wine has been a pineapple and coconut wine - I say interesting I didn't say nice! We made it for a niece who hated wine and loved Malibu. The wine which I am most pleased with is my own passion fruit wine. The passion fruit itself has such an interesting smell, part floral, part citrus and part fruit...
Making it into wine produces a pale yellow/white wine that is crisp in flavour with a stunning nose! I thought I would share this as it is also a real cheat's approach to making wine; I am sure many foodies may be appalled at the idea, but it does work! I think in the end,more so when it comes to a home brew, the fun is less in the making and more in the drinking!

The Noshlette's Passion Fruit Wine Cheat!
To make 1 gallon of wine (6 X 75cl.)

Ingredients
4 litres passion fruit juice (yes, from a packet!)
1 litre white grape juice
(also from a packet!)
300g fructose or brown sugar
1 pkt wine yeast (you can actually use bread yeast if wine yeast is unavailable)
1 tea bag steeped in 3tbsp hot water for 5 minutes*
juice of 1/2 lemon
1/2 cup raisins chopped

Mix all the above ingredients (except the yeast) in a fermenting bucket or gallon container that is completely clean and food safe. Make a fermentation starter by simply adding yeast to a small dish full of sugar water (tbsp sugar to 2 tbsp water) - when the yeast starts to bubble, the whole thing is added to the wine mix (also known as a must).
Leave for 1 week in a warm (12 - 30 deg.) dark place, stirring the must once every day to get rid of the build up of c02. If using a fermentation lock, simply swirl the whole container. At the end of the week, strain the must through a sieve into another clean gallon container and leave to clear. If campden tablets are available - use 1 crushed tablet to help in clearing. However this is not necessary, the wine will simply take a longer time to clear.

Wine is more or less drinkable when it is crystal clear (aprox. 30 days) - however for complex flavours to develop - let the wine mature atleast 6-10 months.

*Tea must be made from tea leaves and not herbal infusions as it is the tannin from tea that is desired

Tuesday, 6 February 2007

Nosh Lab : Turkey - Katsu

Turkey (shichimenchou)- katsu is what is usually served in my home in place of Ton (Pork) katsu.

Not all Japanese food is about raw fish, although I do suspect that the creation of Tonkatsu which is basically Japanese deep fried pork cutlet in bread crumbs - is a western inspired creation. A more 'traditional' recipe is offered here

The essential ingredients in this dish which make it distinct from other deep fried "meat in bread crumb recipes" are :
Bull Dog Tonkatsu Sauce
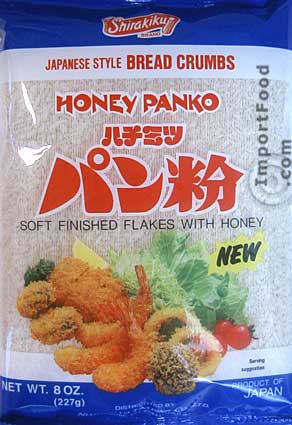
and Honey Panko Bread Crumbs
-
as well as the assorted condiments that go with the dish.

It is still possible to recreate these recipes without these two essential ingredients - but it just wouldn't be Tonkatsu.


I find that Turkey makes for a better substitution to pork in this recipe , although pork has it's own distinct flavour and texture. In some ways I would say that Turkey is a far better and even healthier choice over making Tori/Chicken Katsu - as I find this can sometimes result in very dry and flakey meat. Whilst I enjoy pork, it is not a meat that is popular in my household for dietary reasons.

Perfection in this dish is achieved by having a crisp dry bread crumb shell encasing tender and succulent meat on the in. The Panko breadcrumb is clever in this way - unlike ordinary bread crumbs (and particularly your sage and onion type of pre boxed crumbs) you will find that Panko breadcrumbs are almost shard like in shape and airy in structure. I speculate that the honey/sugar content in the crumbs helps it to caramelise adding yet another crisp texture within the crumbs themselves. (Conjecture on my part as I have no idea what Panko Breadcrumbs are really made of - just that they work like magic!). If Panko breadcrumbs cannot be got then I would strongly advise making your own from whizzing up stale* white bread - better if the bread is somewhat sweet in nature (ie. brioche or soft dinner rolls)

Serving
4 medium sized turkey steaks

For making bread crumb coating :
1 egg 1 tsp milk 50 grams plain white flour 100 grams Panko bread crumbs

Method :
Blot steaks with kitchen towel to remove excess moisture - then dust with plain flour.

Beat egg and milk together well (you can omit the milk if the egg is large and is enough to coat all your steaks, alternatively use two eggs instead of one)

Arrange your work space so that you have your floured steaks, egg mixture, bread crumbs and holding plate to hand.

Dip each dusted steak into egg and milk mixture till well coated and then coat in bread crumbs. Set aside till all the steaks have been prepared as such and refrigerate for about 10 minutes before deep frying.

When deep frying, make sure your oil is hot enough to cook and seal the coat of breadcrumbs as you immerse your steaks. Reduce the heat if your breadcrumbs are browning too quickly. The crumb coating should be this lovely even golden colour before removing from heat.
Blot excess oil on kitchen paper as you remove the done steaks from the oil. Because the steaks are cold, remember that they reduce the temperature of the oil as you add them. It is better to fry the steaks one or two at a time rather than all in one go so that the temperature of your oil does not drop as drastically.

Serve immediately, accompanied by hot fluffy Japanese rice and assorted condiments (Tonkatsu sauce, Tsukemono - or Japanese pickles, Miso soup, finely shredded white cabbage with QP mayonaise and yellow mustard )

To eat - Dip a slice of your pipping hot katsu into your Tonkatsu sauce***, and shovel in to mouth closely followed by some rice and pickle** - yummy!


*stale is when the bread is a few days old and no longer soft - not when it is mouldy!
** pickles are an acquired taste - the ones shown in this photo are pickled aubergine in red shiso leaves (red perilla).
*** if you are unable to get Tonkatsu sauce, Sainsbury's fruity sauce is a closer equivalent than worcestershire sauce and ketchup. However it is considerably tangier - temper this with a squeeze of fresh lemon juice, 1tsp light soysauce and 1tsp brown sugar.

Monday, 5 February 2007

Nosh Lab : Experiments in foodie perfection (Intro)


Often I find that the experiments I do in my kitchen, tend to be about capturing something I have tasted before, or remember quite fondly. Some involve family recipes that have no notations and are perhaps echos of the originals as interpreted by me. Some are about capturing remembered dishes that I have tasted in my travels or restaurant dining experiences; Some are about finding suitable substitutes in the absence of those exotic ingredients. Some are ofcourse things I have simply thrown together because they sounded like a good idea.

Pincilla found it funny that none of the pictures in my blog are taken by me. This isn't all true (or atleast won't all be that true). Granted, most of the pictures you will find here were taken by the Pincilla; I have been known to snap the occasional pic of my own creations.

I look at it this way; My main concern is the taste of the food which is president over taking photos of it for posterity. I am just glad that I have friends who do!

How the blogs labeled 'Nosh Lab' differ from those simply marked 'Nosh Recipes', is their experimental nature. The entries herein contain my own notes, hyperbole, theories and observations.